Thursday, April 11, 2013

Beauty Secrets Revealed | Lip Prep Steps

Thursday, April 11, 2013
'You have to treat your lips the same way you treat your eyes.
For these delicate areas, you need ingredients that not only correct
but also prevent.' - Lev Glazman, Fresh Co-Founder.

Hello my gorgeous readers! I hope you all had a fabulous Thursday! A year ago today, I started dating the most amazing man I had ever met. My boyfriend has honestly changed my life and has showered me with love & laughter! Sounds cheesy right? Well it's true! I feel truly blessed and I have to say that love is a very powerful thing and I hope everyone experiences it in their lifetime! xo. Before I go off on a LOVE tangent, lets move right along. Actually, this post might benefit us all in the 'Love department.' I don't know very many people that enjoy kissing someone with dried up/chapped lips, do you?

How To Get Soft/Kissable Lips


Step 1:
This is a sweet tasting treatment that leaves your lips feeling incredibly soft, smooth, and kissable. It's made with Red Brown Sugar crystals. These crystals will help you gently remove and buff away dry/flaky dead skin cells. Sugar is a natural humectant for the skin. It has antiseptic properties, that aid in the skins healing process. The Sugar Lip Polish consists of many other ingredients to help nourish the lips. These hydrating ingredients are Meadowfoam Seed, Jojoba Seed, and Grapeseed Oil. Key ingredients like these will absorb quickly into your lips during the exfoliation process. This product also contains Shea Butter and Vitamin-E. The Shea Butter will leave your lips feeling moisturized and protected, while the Vitamin-E prevents any future signs of aging caused by free radicals.

How to use the Fresh Sugar Lip Polish
I personally always apply a very small amount of this product on a tooth brush or a disposable mascara wand. I will then scrub my lips very gently until they look smooth and plump. Afterwards you can remove it easily with a wet wash cloth or a splash of cold water. I like to use this product 2-3 times a week depending on how dry my lips are. *This product will induce color in the lips & leave them looking plump and healthy. Whatever you do, try not to eat it. It's very tempting because it tastes just like brown sugar. Although there is brown sugar  in it, nowhere on the packaging says that it is alright to eat it! Nom noms.


Step 2:
Like I said previously, sugar is a natural humectant that binds moisture to the skin. This anti-aging lip treatment has been proven to help repair, hydrate, and smooth out any fine lines and wrinkles with the help of Hyaluronic Spheres. This will not only hydrate the lips, but add volume as well. Other supporting ingredients like Sea Fennel Extract will help define the lip area. Orange Extract will aid in protecting the lips, while Cupuacu Butter, Plum Seed Oil, and Passionflower Seed Oil blend together to repair and restore. I'm absolutely without a doubt addicted to this lip treatment. My lips always feel silky smooth and I love the citrus scent. It's very Fresh!


TAH DAH! Well that was easy, don't you think?
You will now have soft/kissable lips.

You can stop reading here if you tend to stick to the bare minimum when it comes to lip products.  If you are someone like me, where you have trouble with your lip colors feathering, bleeding, creasing, caking, then keep on reading! These next two products will give you the confidence you need to leave the house wearing a lip color that normally ends up looking like a lipstick mustache within an hour. Such a shame! Tisk Tisk, lets fix this mess! 


Step 3:
When you see the word primer, think about what a primer would do before you paint a wall. Not only will the colors be more vivid after you've primed, but it gives the paint something to adhere to. This lip primer will lock down any lip color you place on top of it. It prevents fading throughout the day, bleeding, and even the occasional creasing as our lips become dehydrated. The formulation is very smooth and creamy, and is enriched in Vitamin-E to help repair. Lip Insurance will leave a bit of a tacky feeling on your lips, but this is just to give your lip color something to stick to.


Step 4:
Now don't get me wrong I love color, but I'm absolutely in love with this colorless lip liner. I honestly can't live without this product and I'll tell you why! I have the most oddly-shaped upper lip! The minute I put on any lipstick/lip gloss and rub my two lips together, DISASTER STRIKES! This is one of the only products I use that prevents the disaster from happening. The 'MUFE Lip Line Perfector' creates an invisible barrier around your lips to help prevent your lip colors from feathering. I love the fact that it glides on evenly without any tugging, and it fills in any cracks/fine lines. It's definitely worth checking out if you have the same problem as I do. I love using this when I wear my MUFE 'Moulin Rouge.' I don't need a red lip liner at all, there is never any bleeding if I have this on! xo.

Well my loves, that is all for today! This is all you will need to have baby soft lips and vivid long-wearing lip color! I hope you all enjoyed!

Wednesday, April 10, 2013

Ben Nye Luxury Face Powders

Wednesday, April 10, 2013

Hello my gorgeous readers! Oh how I've missed you all! I had my followers on Instagram take a vote on what they'd like my next blog post to be about. For some reason I had a feeling the Ben Nye Luxury Face Powders would win! I would have posted this sooner, but the batteries to my iMAC's keyboard decided to die! Hah, I was just too lazy to hit up WalMart to buy batteries. Finally I just ended up taking the batteries from my TV remote. Yes, I'm that lazy and no I am not ashamed.

Now lets jump right into things!
Behind the brand: 
-Ben Nye Makeup Company was created back in 1967 by mister Ben Nye himself. He was a world renowned makeup artist, working mainly in Hollywood films such as 'The King and I' (1956), 'Planet of the Apes' (1968), and even 'Gone with the Wind' (1939). After spending over four decades in the film industry, he retired and created the Ben Nye Makeup Company. As for today his son/CEO Dana, has been left in charge of a cosmetic line that has just recently became more notably famous due to you know who! Well come on, don't you know who? Kim Kardashian.. duh! Ben Nye Makeup Company isn't as big of a secret for the Hollywood celebrities and stars anymore! Makeup artists have been using these products for decades, but now it seems the world has not only gained access to these products but they've become just as addicted. Now before I get into the Ben Nye Luxury Face Powders I'd like to talk about one of Ben Nye's Colorless Face Powders.


Neutral Set Translucent Powder is a colorless powder that leaves the skin looking naturally smooth while minimizing the appearance of pores and uneven texture. It blends beautifully on anyone, from the fairest all the way to the deepest of skin tones. This product was formulated to help control perspiration/oils. If you ever wondered how dancers & people on stage keep their makeup in place the whole time, this is the miracle product! I love using this on my brides right before I hit the road. I can leave confidently, because I know their foundation will wear all through the night. Love it! My boss actually taught me a few tricks with this product that I will share with you all in another blog post! Something to look forward to!

What are the Ben Nye Luxury Powders?
-These powders were created to help neutralize/brighten any skin tone while leaving the skin with a soft/smooth matte finish. The texture of these powders feel absolutely amazing on the skin, and because they are micro-milled, they feel light and airy as well. It is almost as if you've put nothing on your face. These powders glide along your skin with ease leaving a soft-focus finish. Not only that, but it seems as though the product lasts a lifetime! You only need the teeny tiniest amount for your whole face, a little goes a long way.


Ben Nye Cameo Luxury Powder is a translucent pink/beige color. Anytime you see the color pink think brightening. If you feel as though your skin looks very sallow (almost sickly) or if you have an uneven complexion due to hyper pigmentation, scarring; OR! you've been blessed with dark circles under the eye area. Cameo will give you a slight brightening/evening effect without feeling like you are caking on a heavy powder on top of your foundation. I prefer to use this powder on fair-medium skin tones.


Ben Nye Banana Luxury Powder is a translucent beige color with yellow tones. Opposite to yellow on the color wheel is purple. Any color opposite to another color on the color wheel will help to neutralize. When you think about Kim Kardashian's infamous obsession with this product, you have to think about where she applies it most. She applies this powder under her eyes to set her concealer. What is a skin concern that the majority of us suffer from under the eye area. I'll give you a hint: it has to do with descent, aging, lack of sleep, and can even be hereditary. You guessed it, the fabulous unconditionally loved DARK STINKIN' CIRCLES! Purple/blue/red. We all experience this a time or two in our life, hah! The yellow will help to brighten and neutralize the darkness. Personally I feel this powder works really well on anyone from light to medium/deep skin tones. Anyone extremely fair I would go with the Cameo Powder under the eyes. Not many fair/freckled people can pull off the yellow JUST under the eyes,  because the rest of their face is most likely cool toned. Cool undertones will be able to wear this powder ALL OVER, but not in just one specific area. This will help warm up the complexion subtly. DO NOT apply it just under your eyes if your skin is more cool toned or it will look extremely unnatural. I will go over how to determine undertone/surface tone in another blog post.


Ben Nye Beige Suede Powder is a translucent beige with brown tones. This color looks great on ALL skin tones. Now you must think I am absolutely crazy! I don't know about you lovely readers, but I try to keep my face out of the sun. Especially during the spring/summer months. Gotta stay young! My face is ALWAYS lighter than the rest of my body. This color is the perfect all over warmth to set your foundation. Deeper skin tones benefit from this powder as well. Many setting powders out there leave deeper skin tones looking ashy due to the lack of warmth in the product. If those types of products are applied incorrectly it will look even scarier! Products that cause a white/gray cast to the skin are most likely not milled to a fine enough state.


Now carrying around these four huge powders in my kit, wasn't my idea of a good time. I knew it would be a waste of valuable space. I came across this Stackable Empty Power Jar with sifters for only $6.00 USD on the MakeupCreations website. I love it, it saves so much space and makes these powders travel-friendly. Now the prices of the Luxury Face Powders have just recently gone up, but I feel they are still completely worth it! You get so much product, it lasts you forever, and they look absolutely amazing on the skin. Try it for yourself! xo.

Friday, April 5, 2013

Z Palette Review | Lipstick Palette DIY

Friday, April 5, 2013

Hello my gorgeous readers! Over the past few months I've been trying to find a streamline way to consolidate my freelance makeup kit. I wanted something that was going to be a little bit more travel friendly. The fact of the matter is I didn't want to have to downsize my kit, because the makeup I had I knew I needed. After spending hours online searching; I came across the Z Palette. I had heard about the company many times through YouTube, but I never took the time to galavant through their website. Once I did, I knew I HAD to buy one!

The creator Zena Shteysel is a makeup artist that has worked on several celebrity faces in Hollywood.  Knowing this not only makes it easy for me to respect her business, but made me quite eager to see what she had to offer. She created the Z Palette not only for makeup artists, but for women & men everywhere! If you are tired of traveling with big bulky makeup in your kit, or you just want to minimize your clutter at home, the Z Palette is the way to go!

What is a Z Palette?
-A Z Palette is a customizable palette that is sold empty so you can fill it up with whatever makeup your heart desires! The base of the palette itself is magnetic giving your products something to adhere to. My favorite part is the lid; I love that it has a clear window, making it extremely efficient while looking for a certain color in your kit.

The Z Palette comes in a variety of different sizes & colors, and they even have a "domed" palette which is perfect for MAC MSF'S or even your Milani baked blushes! I opted for the Black-Small Palette that retails for $14.00 USD on their website. 

I figured this palette would be the perfect size to fit some of the lipsticks I use in my freelance kit. Z Palette's are considered "ideal for home and portable for travel." They are made with eco-friendly materials as well as a sturdy plastic. I'm telling you it will keep your makeup (aka precious cargo) safe from harms way! Prices for Palettes will range anywhere between $14.00-$25.00 USD.

The Z Palette website also sells Empty Metal Pans in packs of 10-60. This will cost you anywhere between $4.00-$12.00 USD. These empty pans make it possible for you to customize your Z Palette literally any way you want! They are magnetized so they automatically stick to the base of your Z Palette. I chose a pack of 20 for $6.00 USD.

*If you are looking to use a Z Palette for your MAC eyeshadows or a product that has a non-magnetised base you will have to purchase the square or round metal stickers on the Z Palette website. The metal stickers come in a pack of 30 and will adhere to the base of your products. You have a choice between the Round Metal Stickers $5.00 USD or the Square Metal Stickers $6.00 USD.

What did I choose to use my Z Palette for?
-I suggest to any makeup artist that carries around more than 20 lipsticks at a time to consider a Z Palette. 20 lipsticks can take up quite a bit of space. Usually they could take up a whole entire thin drawer in my Japonesque Pro Studio Case. (Link to Review.) Now I have 16 lipsticks in a very compact/sleek case and I couldn't be happier! I'm officially clutter free.

DIY Lipstick Palette
Supplies Needed:
1) Candle
2) Lipstick of your choice
3) A metal spoon
4) A knife
5) Empty metal pan

Step 1: You will want to twist your lipstick all the way up and cut it towards the base of the tube. Once you have done that, from the piece you have cut off, cut a very small slice of the lipstick. (as if you were slicing a cucumber.) Place the slice onto your metal spoon. (Mine got somewhat messy; probably because I'm a clumsy mess and I can't cut a cucumber let alone a lipstick! Hah, just kidding!

Step 2: Once you have placed your lipstick chunk on your metal spoon slowly & carefully hold the spoon over the flame of the candle and wait patiently for the lipstick to melt! Whatever you do, don't put your lipstick right into the flame or you will burn it! Trust me, it is not a cute look or smell! Wait patiently my dears!

Step 3: Once the lipstick is completely melted, DO NOT, I repeat DO NOT touch the spoon where the lipstick is! Unless you really want to scream like a curious child's first touch of a bright orange stove top, I suggest you avoid the pain! OUCH! Pour your melted lipstick slowly into your empty pan. If you find that the lipstick hasn't fully filled your pan, go back in with you knife and cut off as much as you think you'll need. Repeat the process. Now for me, I like things to look perfectly neat and clean so after I was done, I put the now-filled pan of lipstick onto the spoon and I held it over the flame to remelt the lipstick whilst in the pan. This helped the lipstick settle flat in the pan, giving it a very clean/even distribution! It should look something like this when done!

Make sure you let your lipsticks cool down before you go on and touch them! They are HOT HOT HOT! Once you have completed one, the rest will be a piece of cake! Hmm, I could really go for a piece of cake right now! Click here to go to the Z Palette website and go make me a cake while you are at it! Hah!

Tip:* 
Once your actual lipstick is now into two pieces, it's as simple as holding both cut ends towards the candle flame and then sticking them two together while they are HOT! Be the best doctor you can be & mend it back together again! xo.

Well that is all my dears! Hope you all have a fabulous night! 
Love you all,

Wednesday, April 3, 2013

Monthly Favorites | March

Wednesday, April 3, 2013
Hello my gorgeous readers! Hope you all had an amazing Wednesday! This is going to be my very first Monthly Favorites post & I have to say I'm really hoping that I'll be able to complete one of these posts once a month! It will probably be easy the first few months doing this, because I will basically have an imaginary list in my mind of beauty related items that I use on the regular. Once that list dwindles down, we might have a problem! Hah! Good thing I'm obsessed with trying new things, otherwise these monthly favorites would end up getting pretty boring! Hah!

Rabito Genuine Bling Bling Bunny Rabbit Case for iPhone 5 $33.50 USD Let me start off with a non-beauty related item to change things up a bit. Okay, don't laugh but this case makes me feel like a little kid & I absolutely LOVE it! I get compliments on it every time I take my phone out in public & seeing as Easter was this month, I feel like the case was almost like an Easter decoration that I carried around with me for a good laugh! The little fuzzy tail is super soft & don't you worry; it isn't real fur so no animals were harmed! The tail has a suction cup which gives you the ability to take it off to clean your iPhone screen, or if the darn thing just keeps getting in your way! The tail enables your phone to sit up right, so you can sit back, relax, & squint at your tiny little screen! Hah! The case is rubber but it has a glossy & sparkly finish, making it extremely easy to clean. The ears are super sturdy & I haven't had a problem with any wear or tear! I'm always on the hunt for a case that doesn't have that matte/rubbery/tacky finish. Every time I buy one like that it is stained with makeup in less than a week, almost as if it were a magnet for dirt & grime. That's why I love this case, it stays clean & shiny 24/7!

Real Techniques Blush Brush by Samantha Chapman $8.99 USD Now this brush was a recent add-on to my ginormous collection of brushes. Oh Em Gee I sure do love this brush! It's kind of ridiculous that whenever it gets dirty, I almost start feeling depressed because my routine just doesn't feel complete without the use of this brush. In my opinion "there are no rules for your tools," meaning you can use your brushes for whatever technique or step in your routine without question. Although the brush is called a "blush brush, "I tend to use this brush with either translucent setting powder or a foundation powder to set my liquid foundation. The synthetic taklon bristles are extremely soft and because the bristles are hand cut I find it to be very high quality. It is also 100% cruelty-free.

Flower Beauty Zoom-In Ultimate Mascara in Intense Black $7.98 I'm always on the search for the best mascara out there. I've tried heaps & heaps of mascaras and when I came across this new mascara from Drew Barrymore's cosmetic line I was desperately eager to try it! I instantly fell in love with it after just one use. Like I said before, I've tried my fair share of mascaras and I have piles of it in my collection but this mascara I've used everyday since I purchased it, which is highly unlike me. Seeing as I have so many mascaras I like to change it up & try new ones as often as I can but I have just recently realized that I might actually be addicted! The brush is adjustable which sort of reminds me of the Buxom Amplified Lash Mascara that retails for $22.00 on the Sephora website. It basically gives you the ability to add fullness, length, & definition all in one mascara! It's extremely buildable and I find there to be minimal clumping which is always a plus! The mascara itself has D-panthenol in it which helps stimulate growth! I've also noticed that my lashes seem longer & less fragile than they were before I started using this mascara. All in all, I plan on repurchasing this mascara!

NARS Velvet Gloss Lip Pencil in Mexican Rose $25.00 What better way to get into the Spring-Like spirit then adding a pop of color on the lips. To me this color just makes me smile. It is a bright hott pink shade, but the consistency of the NARS Velvet Gloss Lip Pencils is what really makes them worth while. They are extremely hydrating with ingredients like vitamin e, phytosterol esters, & hyaluronic acid. The glossy finish it gives to your lips will help to smooth out any fine lines & cracks while giving you just the right amount of color.

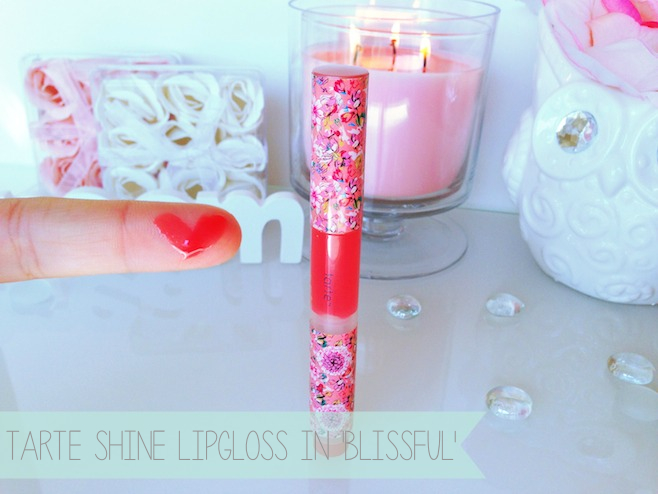
Tarte Maracuja Divine Shine Lipgloss in Blissful $21.00 The love I have for this lipgloss is crazy! It is such a beautiful bright coral shade! This gloss has been my go-to, simple & easy lip for the month of March. I love that in just one product, I have extreme moisture, high shine, vivid color, & a plumped appearance! The fact that I don't need anything else when I wear this gloss makes it perfect for those lazy days where extra steps just aren't in the cards!  Blissful gives you effortless beauty.

Flower Beauty Nail Lacquer in Thistle or That? $4.98 (I tried to find the Charlotte Russe Nail Lacquer on their website, but it seems to be discontinued.) I figured it would be important for me to add a few nail polishes into my group of favorites. I've gotten into this funk where I literally never get around to painting my nails, and it has become my goal the past few weeks to set aside the time! A girl really needs some sort of pampering every now and again; painting my nails always seems to make me feel better! These colors stood out to me especially for Easter! I wore the blue color on the entire nail bed & the sparkle just on the free-edge portion of my nails! It was the perfect combination!

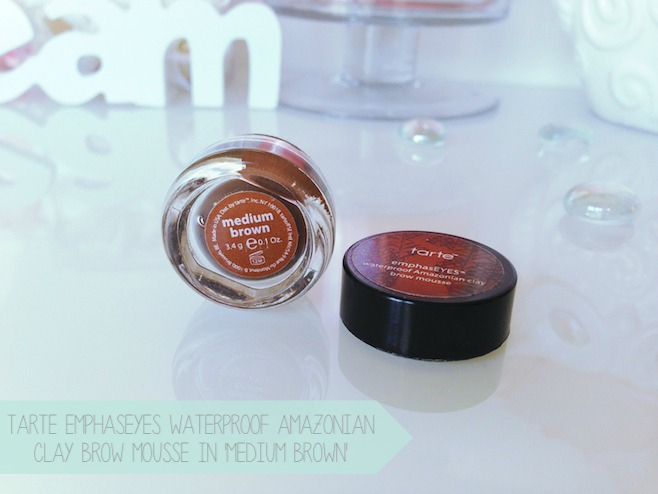
Tarte ephasEYES waterproof Amazonian clay brow mousse $28.00 I can't even begin to explain how insanely obsessed I am with this product! It seriously answered all of my brow problems/prayers. Soon or later you will all find out that my natural hair color is a very light blonde, so you might as well know now! Hah! My brow hairs are not only very light but very sparse as well. They tend to grow in the most random of places. Now if you know me directly you also know that brows are literally my favorite thing to work with on my clients and of course on myself. Many people forget how important brows really are and often times don't realize how they can give the face a sense of balance and help enhance certain features. I bought one in all three shades for my freelance kit because I'm just that addicted! Now I won't talk about it too much now because I plan on doing a blog post and going more in depth, so I'll save that for a later date!


Sarah McNamara Miracle Skin Treat & Conceal Eye & Face in Medium $36.00 I honestly can NOT live without this concealer. This will always be one of my holy grail face products. Let me first give you a brief summarization of what this product is formulated to do & what ingredients are used to help aid in the process. This concealer is basically a triple threat in my book. It's multi-functional, anti-aging, & improves the complexion with each use. It helps to improve dark spots, hyperpigmentation, under eye darkness, uneven texture, plus it also helps to aid the skin in its healing process. It's packed with amazing ingredients like white rose, chamomile, and marine collagen also known as the M3 Complex. It also has jojoba, vitamin k, and vitamin c. The coverage is definitely medium-full and the texture is almost like a whipped mousse. It leaves a matte/satin finish making it easily wearable anywhere on the face. It has helped my skin so much, making it totally worth the $36.00! You should definitely check it out if you are in search of a new concealer!

What are your favorites for this month?
Love you all,

JAPONESQUE PRO STUDIO CASE

Hello my gorgeous readers! I hope you all are having a fabulous day! xo I'm sitting here at my desk eating some bite size Tostitos with some seriously spicy salsa! Yowza, my tongue is one fire! WOO! Anyways hah, if you follow me on Instagram you know that I was planning on doing a blog post on my Japonesque Pro Studio Case that I got solely for my freelance kit. I literally had been eyeing this case for over 2 years on the Internet and every time I was about to buy it, I'd change my mind & stick to my worn down gross looking Caboodle that had dried up nail lacquer & makeup stains ALL over it! It finally got to the point where I was like, "You know what, this does not look classy in the slightest bit! It's officially time for an upgrade!" I can't even tell you how excited I was to get this thing! I waited and waited, then I waited some more. IT FINALLY CAME after three long weeks; lets just say shipping went at a snail-like pace. I waited two years to buy it so I figured three weeks would feel like nothing! WRONG! Bahaha, I'm extremely impatient when I want something; nonetheless it was worth the wait!

As a professional makeup artist it is important for me to display my makeup in a way that makes my clients' feel more confident while working with me. This might sound silly to you, but if you've ever gone to a makeup job with a big huge bag full of makeup thrown in it & you spent half the time searching for something amidst your mess; my guess is your client felt somewhat uneasy while noticing your nonexistent organizational skills. GET IT TOGETHER PEOPLE! Haha, just kidding! This case is honestly the best case to keep you organized. I usually place the case on top of a counter or table, that way when I need something I can go in and out of the drawers with ease. Now before I babble on for no apparent reason, lets get into the review & specs.


The Japonesque Pro Studio Case weighs in at a whopping 15lbs, hah! In all seriousness once you put all of your stuff inside, that's when it starts being a tad bit heavy, but the weight is definitely not unbearable. On the top there is a nice sturdy handle for lifting & there is also a retractable trolley that extends to a surprising height. This way you don't have to maneuver the case around while bending over like you have a hunchback.


Just as the picture shows above you can probably tell that the exterior is all black with black trim and black steel reinforcements. I find the exterior to be very sleek, and quite easy to clean. So far it hasn't fallen victim to my clumsy harsh beatings that my possessions normally endure. Usually there is some form of smashing or dropping, etc. I've been trying to treat it as if it were a child and so far I've been a pretty good mother, hah! You can probably also tell from the picture that the "Wheels on the back go round & round!" The wheels are quite durable although the coloring of them is starting to fade a bit. Haven been rolling around on the pavement outside to reach my car off in the distance, it's inevitable that it would be the first thing to take a beating.


If only I owned my own company, it would say BEAUTYEXEL on the front instead of JAPONESQUE, hah! I do fancy the emblem, it looks very shiny & it definitely stands out against the black exterior. I feel like the exterior of this case is very high quality and was crafted with some decent materials! Lets move on to the interior shall we!


Starting off at the top, there is two over locking latches that you can pop open with ease. There are three latches in total. (Refer back up to first picture to see third latch.) The latches have a set of keys that it comes with just in case you are surrounded by robbers, dun dun dun! Gotta keep that makeup on lock down my dear! Anyways as you can see from the picture the lid has a mesh compartment that is roughly 2 inches deep. I keep my hand sanitizer, alcohol, brush cleaner, setting spray, moisturizer, and my Dinair water bottle dispenser up in the mesh pouch. There is also a well above the drawers. (See above picture for dimensions) In the well I keep my KETT foundations, my Dinar Airbrush System &  all of my Inglot eyeshadow, blush, & concealer palettes. Everything fits perfectly and it is extremely spacious! xo


Now this is like HEAVENS GATE opening up, don't you think? Hah just kidding! By opening up the latch in the middle it opens up to the main compartment, revealing seven drawers. Now obviously from the picture you can tell that there happens to be 14 pouches for brushes. Now let me go into a little more detail about these brush compartments. You have 3 large pouches & 4 small pouches on either side. I can fit around 4 eyeshadow brushes into each of the small pouches and usually I just keep one large brush in each of the large pouches. Totaling out to be enough space for 38 brushes! To me that is just enough and if I had anymore I'd probably start looking like a chicken with my head cut off trying to search through them. Seeing as I was normally used to having a brush belt, I love that I don't have to have something wrapped around my waist!


When I first got my case, my boyfriend looked at me as if he was seriously concerned. He felt that there was no possible way for all of my makeup kit to fit! I started to get a little worried myself & I said, "NO, NO, NO I WILL MAKE IT FIT!" Sure enough everything fits with room to spare. You'd actually be surprised at how much fits into the drawers! By looking at them you might think otherwise, but I promise you they made it possible to utilize the whole entire case without a wasted space. I'll leave my Makeup Artist Kit for another blog post but to give you an idea as to what makeup items might fit into the drawers refer to the measurements above! xo. ;)

So to wrap up this review I'm going to end it by saying that I give this case a 4.5 out of 5 stars. I haven't really found too many cons to this case. The only thing I would say is that the drawers sometimes get stuck & I usually end up having to spend a little time wiggling them back & forth to get them out. Other then that, I'm in love! Oh! I also wish it said BEAUTYEXEL instead of JAPONESQUE on the emblem; a girl can dream right? xo Love you all!

The Japonesque Pro Studio Case retails for $232.00 USD on the (Makeup Creations) website.

Monday, April 1, 2013

SPRING CHEEKS | MAC Blushes

Monday, April 1, 2013
Hello my gorgeous readers! This is going to be my very first blog post! I hope you all are as excited as I am! I don't know about you, but I had an amazing Easter Sunday with my boyfriend's family & friends'! It turned out to be such a beautiful day here in Connecticut! The sun was shining, and the temperature was something worth smiling about! Spring has officially arrived & I can't wait for all of the snow to melt! The weather needs to seriously take a turn for the better! Please mother nature, NO MORE SNOW! Anyways, I'm completely over the cold temperature's and I'm ready for Spring to ACTUALLY start! Each year about the time Easter rolls around, I always feel the need to pull out the pastels & pops of color! It's time my loves, no more dark and dreary!

With that being said, I thought I'd kick off what I like to call the "Season of Color," with a blog post on none other than my favorite MAC Blushes for Spring. I figured this decision was a rather wise one, considering the fact that these colors can truly suit any skin tone. You really can't go wrong with these sweet cheeks!

Fleur Power is described as a soft bright pinkish-coral powder blush on MAC's website. This blush is a Satin finish & by satin finish I mean, Matte & Frost got together and made a baby. So Frost is the X chromosome and Matte is the Y chromosome, Y is the more dominant of the two. I would say Satin finish happens to be one of my favorite blush finishes from MAC. The consistency of the satin finish blushes are like BUTTAH! They blend beautifully and it is almost as if they melt into your skin, in a good way! This color is an absolutely beautiful shade that is flattering on a variety of skin tones! To me it is a Spring must-have! $21.00 USD

Melba is described as a soft coral-peach powder blush on MAC's website. This blush is a Matte finish & by matte finish I mean, no shine what so ever! I personally like this on a scorching HOTT spring afternoon, when you produce enough of your own shine and you don't need anymore "glow" to your skin. Those are the days you already look like you are "Lit from within," or maybe just sweating bullets! Hah! The color gives a perfect natural peach flush to the skin, but I love that it can give light to medium skin tones a "touched by the sun" look without overdoing it. $21.00 USD

Peaches is described as a pure peach powder blush on MAC's website. This blush is a Sheertone finish & by sheertone finish I mean, a very soft/sheer wash of color on the cheeks. Could you have guessed that on your own? Hah! Peaches is by far my favorite blush of all time. I don't know why I could literally wear this blush every single day and be satisfied. I am quite the blush-aholic so I doubt that could really ever happen; but I will say that I have purchased this blush on more than one occasion. The color to me just looks very fresh and youthful on the skin without being too much. I personally love wearing pink/peach blushes all year round, but I pull them out most often during the spring & summer months. Peaches is one of those colors that has enough warmth to give you a sun-kissed look, but it is still fresh & bright enough to stand out! Peaches is a keeper for the cheeks, that is for sure! $21.00 USD

Here's swatches of these lovely shades as well! xo. You can see by the picture that these blushes are highly pigmented & just after one swipe with a finger, the color pay off is fabulous!


Now lets move on to the Pops of Pink!


Pinch O' Peach is described as a warm peach powder blush on MAC's website. This blush, like Peaches is a Sheertone finish. Honestly, I have no idea why in the world they decided to name this blush Pinch O' Peach. To me it does not look peachie in the slightest bit. Maybe there is just a "Pinch" of peach in there, (See what I did there?) but not enough to make the name worth while! Hah! To me this color reminds me of DollyMix but without the shimmer. It applies a little bit lighter as well. This color is gorgeous and the color payoff is just enough and obviously perfect for Spring! $21.00 USD

DollyMix is described as a pure candy pink powder blush on MAC's website. This blush is a Sheertone Shimmer finish & by sheertone shimmer finish I mean, a light wash of color on the cheeks with a glowing sheen. This color is the epitome of Spring! It's truly the color of watermelon, it's almost mouthwatering when you see it! It looks beautiful on everybody because it applies sheer enough to be wearable but shows up enough to notice the youthful glow it gives to your skin. $21.00 USD

Here's swatches of these lovely shades as well! xo. Aren't they beautiful!?xo.


So that about wraps up my very first blog post! I hope you all enjoyed & are ready to go get your spring cheeks on! Muah! xo.
Where to purchase these products: MAC Cosmetics
Related Posts Plugin for WordPress, Blogger...